AWS site-to-site VPN
Have you ever wondered why in some organisations you need to connect to a VPN to use other offices' private information while in some other organisations just being connected to the local network gives you access to all those information?
The answer to this question is how your organisation has set up its network between different offices. In this article, I'm going to show you how to set up the connection between different offices or networks in a way that members of your networks don't need to connect to a VPN if they want to access other offices' private resources.
What's VPN?
A Virtual Private Network (VPN) enables you to connect to another network as if you are in the other network. Since from the network perspective, there is no difference between you and a user physically in that network, you could benefit from access to the resources that only local users could have accessed. There are two main types of VPNs: remote access and site-to-site.
In Remote access VPN, you connect a computer to a network. For example, when you want to hide your actual IP and surf the internet privately. Another use case of this type of VPN is when you want to connect to your organisation's network and access your organisation's private information.
Unlike remote access VPN, Site-to-Site VPN connects multiple networks and all members of those networks get connected automatically with no extra effort. The typical use case for this kind of VPN is when you want to connect multiple offices in different geographical locations.
In this post, I will show you how to set up a site-to-site VPN between two networks in AWS. A common use case for site-to-site VPN in AWS is when you have an on-premise infrastructure and you're moving to the cloud. Since the migration usually takes time, you might end up with a hybrid model for some time. Or maybe your organisation needs to have some servers in-house but wants to benefit from cloud features as well.
Since reproducing on-premise infrastructure can be a challenge, in this tutorial, I'll use two separate networks in AWS but within different VPCs. Since they're in different VPCs, they don't see each other or communicate. My goal is to create a VPN connection between the two networks so they can talk to each other using their private IP addresses without any explicit VPN connection.
Create Instances
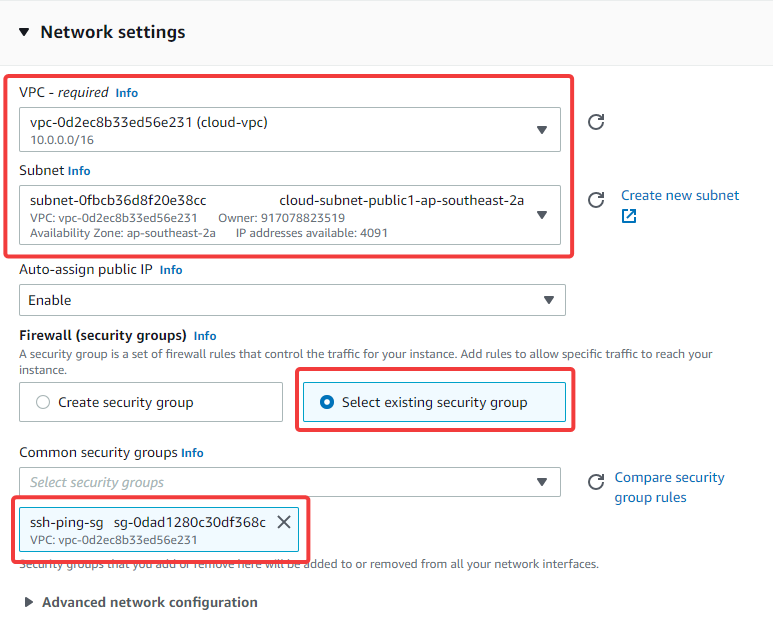
In this section, you'll create two EC2 instances in two different networks. The first resource you need is a Virtual Private Cloud (VPC). VPC enables you to launch other resources in a virtual network. Create two VPCs for this tutorial and name them "on-prem-vpc" and "cloud-vpc". Then create two security groups with SSH and ICMP inbound access. Finally, Create two EC2 instances, one in each VPC. Make sure to put each machine on a different VPC and select the security group you created to allow access to the machines.
If you don't know how to create a VPC, EC2 and/or Security groups, study the following articles:
Get started with Amazon VPC
Security group basics
These are the details of my resources:
- cloud-vpc CIDR: 172.31.0.0./16
- on-prem-vpc CIDR: 10.0.0.0/16
- EC2 Instances AMI: Amazon Linux 2
Ping the public IP address of the instances from your machine and make sure they respond.
ping <INSTANCE_PUBLIC_IP>
SSH into the instance and make sure you can log into the servers:
ssh -i key.pem ec2-user@<INSTANCE_PUBLIC_IP>
Once you're in an instance ping the other instance's private IP and make sure they cannot talk to each other using the private IP address:
ping <OTHER_INSTANCE_PRIVATE_IP>
If all the steps above are successfully done, you've successfully simulated two disconnected networks in AWS that are going to be connected via the VPN by end of this tutorial.
Create the VPN
A site-to-site VPN in AWS needs some dependent resources which you need to create before the actual VPN.
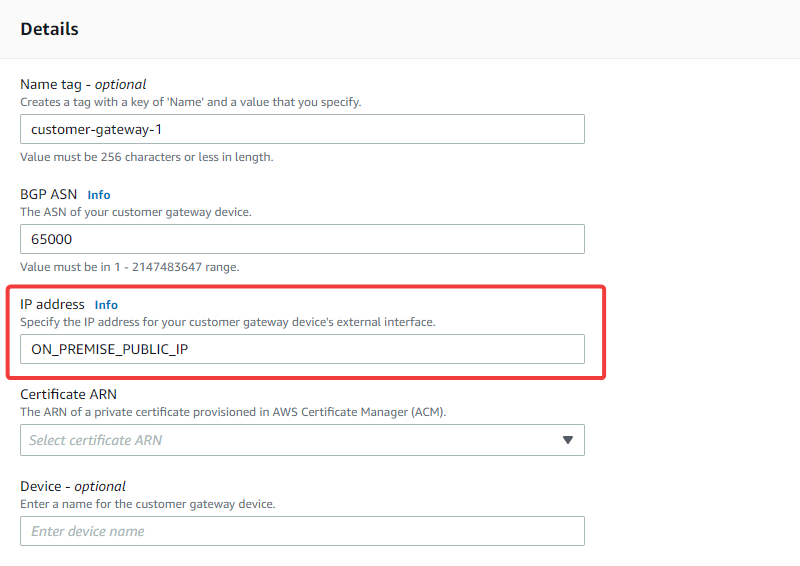
The first resource is a customer gateway. A customer gateway in AWS represents the customer gateway resource in your on-premise network. To create this resource navigate to the VPC page in your AWS portal then in the sidebar select "Customer Gateway" and create a new customer gateway.
It's important to know that the customer gateway is related to the on-premise side of this connection. You'll need to enter the public IP address of your on-premise instance when creating the customer gateway.
The next resource is a Virtual Private Gateway. Unlike "Customer Gateway" which is related to the on-premise side of the connection, a "Virtual Private Gateway" is related to the AWS side of the connection. You need to create a virtual private gateway first and then attach it to your AWS VPC (cloud-vpc).
It is important to remember that the "Customer Gateway" is related to the on-premise side of the connection and the "Virtual Private Gateway" is related to the AWS side of the connection. Be careful not to confuse them.
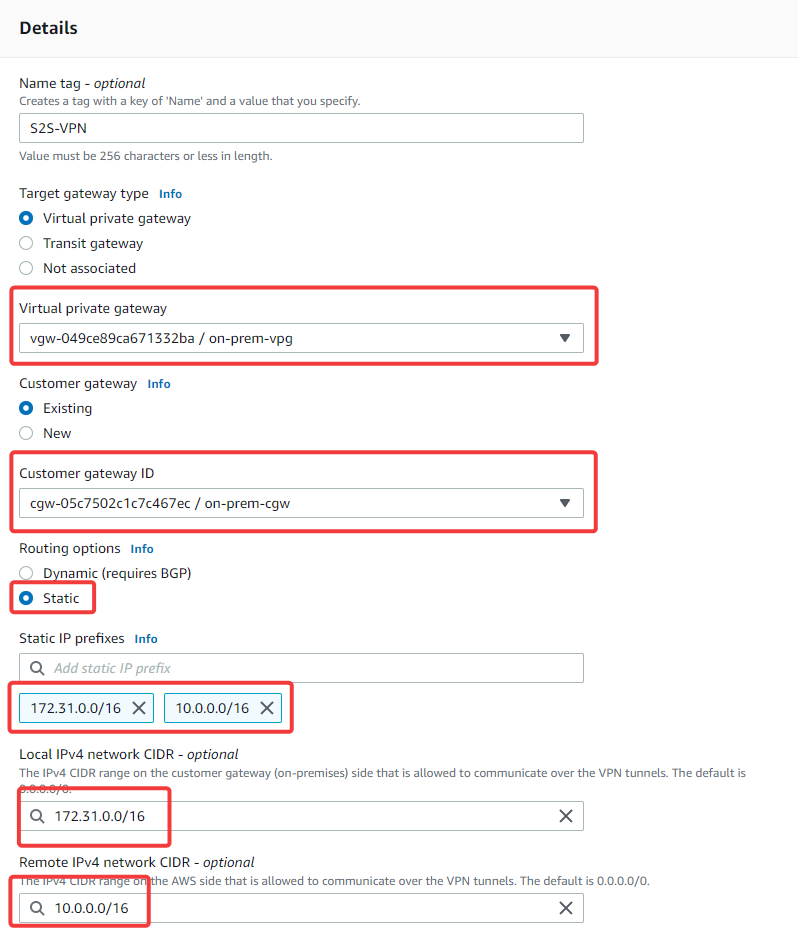
These two AWS resources are needed for our VPN connection. Now you can navigate to "site-to-site VPN connection" and create a new VPN. Select the newly created virtual private gateway and customer gateway. Change routing to static and enter the CIDR block of both on-premise VPC and cloud-vpc. For "Local IPv4 CIDR" use on-prem CIDR and for "Remote IPv4 CIDR" select cloud-vpc CIDR.
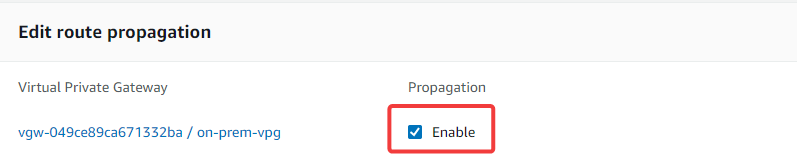
It'll take some time to create the VPN connection. Meanwhile, you can navigate to the "route table" in the sidebar and enable the propagation for the public route table associated with your AWS VPC (cloud-vpc). Make sure to enable the propagation for the public route table associated with cloud-vpc.
Install VPN Server on On-premise Instance
The last step is to install a VPN server on the on-premise instance. In this tutorial, I'm using use Openswan but feel free to choose any software based on your requirement. Openswan is an open-source IPSec implementation that needs to be installed on your on-premise machine. SSH into your on-premise instance and run the following command:
yum install openswan -y
On the AWS portal Select your VPN and download the configuration file for Openswan and follow the instructions.
The first step is to copy the following configurations to /etc/sysctl.conf and apply the changes by executing the sysctl -p command:
net.ipv4.ip_forward = 1
net.ipv4.conf.default.rp_filter = 0
net.ipv4.conf.default.accept_source_route = 0
Create a new file at /etc/ipsec.d/aws.conf and copy the following configuration to the file:
conn Tunnel1
	authby=secret
	auto=start
	left=%defaultroute
	leftid=13.55.163.221
	right=13.236.221.160
	type=tunnel
	ikelifetime=8h
	keylife=1h
	phase2alg=aes128-sha1;modp1024
	ike=aes128-sha1;modp1024
	keyingtries=%forever
	keyexchange=ike
	leftsubnet=172.31.0.0/16
	rightsubnet=10.0.0.0/16
	dpddelay=10
	dpdtimeout=30
	dpdaction=restart_by_peer
The leftsubnet value is your on-premise VPC CIDR and rightsubnet value is your AWS VPC CIDR. If you're following this step from the downloaded configuration file, be sure to remove the auth configuration.
Now start the IPSec service and verify it's up:
systemctl start ipsec
systemctl status ipsec
Copy your secret included in your downloaded config file and append it to the following file in the on-premise instance:
/etc/ipsec.d/aws.secrets
Now go back to your AWS portal, select your VPN and navigate to "Tunnel Details". If you've done all the steps correctly, then "Tunnel 1" should be "Up".
Verify the connection
To verify that your VPN connection works, you need to ping instances connected via the VPN using their private IP addresses. SSH into either of the instances and ping the other instance using its private IP Address:
ping <PRIVATE_IP_ADDRESS_OF_OTHER_INSTANCE>
If you can ping the machine in the other network using its private IP address, it means that any device on this network can talk seamlessly to the other network without any explicit VPN connection.
If the ping times out or fails, make sure the VPN tunnel is "Up" and the propagation for the public route table of your AWS VPC is enabled.
Conclusion
If you've followed this post so far, you should have created a site-to-site VPN between two different networks. As I've shown you, creating a site-to-site VPN in AWS is straightforward. You only need to be mindful of the IP addresses and sub-networks, and be careful not to confuse them.
Site-to-site VPN is an effective way for organisations to connect their offices. Users don't need to worry about the VPN connection, and it's all been taken care of in the network layer. Just being connected to your office's local network, is enough to give you access to your organisation's private resources.
Please make sure to clean up your resources in AWS since the VPN and active EC2 instances incur charges to your account.